Here are the steps to install Transdroid when you use Vuze on Mac OS X:
Setting up Vuze
Vuze on Mac has a pretty large userbase. It has extensive media converter and device playback features like iTunes library importing. To download the latest version, go to the official Vuze website and download the installer.
Note that you’ll have to use Vuze with Java 6, as the required XML over HTTP plugin in incompatible with Java 7 at the moment.
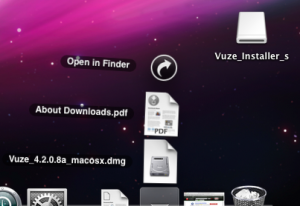
Start the installer from the downloads stack or directly from the directory where you saved it. The installer itself only has 2 steps; easy as that.
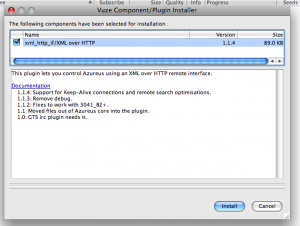
After starting Vuze using Spotlight or via the Finder, you should install the XML over HTTP plug-in. This forms the communication layer between Vuze and Transdroid. Choose ‘Tools -> Plugins -> -> Installation Wizard’ and use the wizard to install the XML over HTTP plug-in.
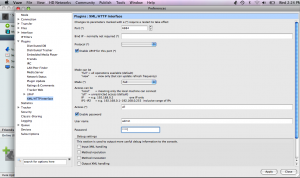
When the plug-in is installed, go to ‘Tools -> Options…’ and open the ‘Plugins’ tab. Make sure that the XML over HTTP plug-in is enabled. It should now be possible to open this plug-in’s settings screen. This allows you to configure remote access. You can leave the port number to 6884. Make sure you set the mode to ‘full’ access and do not use IP filtering. Next, check the ‘Enable password‘ option and fill in a username and password of your choice. Click ‘Apply’ to confirm your settings.
You may want to open the XML over HTTP plug-in’s logging window using ‘Tools -> Plugins -> Log Views -> XML over HTTP’. This window shows some statistics and generates log messages when a connection is attempted.
Remember that you always leave the application running to allow Transdroid to connect to it.
Allow access from anywhere
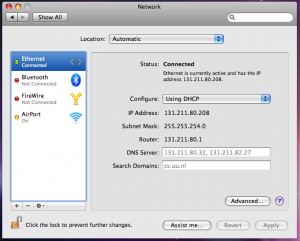
The next step is very important if you want to use Transdroid to control Vuze from anywhere you go and not just your home Wi-Fi network. You will need to open up the port 6884 and redirect this to your home computer. First get your Mac’s local IP address. For OS X 10.5 (Leopard) and 10.6 (Snow Leopard), select the Apple menu and choose ‘System Preferences…’ or use Spotlight to find it. Here, choose ‘Networking’ and on the left click the active network adapter (Ethernet for wired and AirPort for wireless connections). The local IP addres is shown in the networking status.
With Mac OS X 10.4 (Tiger) and lower, select the Apple menu and choose ‘Location’ and then ‘Network Preferences…’. Next to show, select ‘Network Status’ which will show the active network adapter and its IP address.
Now go to your the manager interface of your router or ADSL modem. It will most likely have a NAT tab or settings screen. Here you will need to set up a port forward from all external traffic on port number 6884 to your local computers’ IP address – the one that you just retrieved from the Network screen – on the same port. There are too many routers and ADSL modems to make detailed explanations here, but you can use the website PortForward for in-depth help.
Setting up Transdroid
The final step is to set up Transdroid. Install the software from the Android Market and open up the application. You will see a message that you need to set up a server configuration first. Hit your Android device’s menu button and choose ‘Settings’. Next, click the ‘Add a sever’ button to create your first sever configuration. You can add more later, if you need to.
Now fill in all the settings. The name is totally up to you. From the type menu you choose for Vuze of course.
The IP address is your server’s external IP address. If you do not know this, open up a browser on your Mac and surf to whatismyip.com. It will present you the external IP address that you need in Transdroid.
The port number is the next setting and is 6884. (Except for when you manually changed it, of course.) You entered this in the XML over HTTP plugin settings screen.
Since you have enabled authentication as well, enable this setting and fill out the username and password that you choose earlier.
Time to test your settings! First disconnect from the Wi-Fi network if you are connected to the local network (the one where your Mac is in as well). This is important, because you will need to use different settings for that.
Now, hit the back button of your Android device twice to return to the main screen. It should now state that it is connecting to the sever. After a couple of seconds you should get a listing of all the active torrents in Vuze. Reward yourself by downloading some torrents, right from your phone. 🙂
Local Wi-Fi network access
One thing you should know when you have a Wi-Fi network at home, is that you cannot use your external IP address as described above while you are connected this way. When connected to the wireless network that your Mac is in, you will need to use your machine’s internal IP address instead.
Easiest thing to do is to open Transdroid’s settings menu again and add a new sever configuration. Use the exact same details that you used before, but now use your Mac’s local IP address. Of course you also want to give it a name that identifies it as being your local configuration.
Give it a test by going to the main screen and choose ‘servers‘ from the menu. You can select the other configuration from the pop-up menu. A little tip: switching servers can also be done by swiping your finger from left to right (or the other way around). No need to open the menu each time!
Troubleshooting
If Transdroid refuses to connect you, use these steps to trace the problem.
Make sure that the XML over HTTP plug-in is running. You can open a logging window for the plg-in that should show any connection attempts.
Check if you can connect using Transdroid while connected on your internal Wi-Fi network. Remember to use you internal IP address now. If this works but external connections via 3G/EDGE don’t, you have not set up the port forwarding correctly.
Still having troubles? Use the ‘error report’ feature in Transdroid’s menu to get personal help.
Good luck and enjoy!


Too many recent authentication failures from ‘my phone’s ip’ – rate limiting
There used to be a bug in Transdroid that caused that. What version are you using? Please send any error report to transdroid.org@gmail.com